|
Stitchery
Projects These were one of my favorite projects. I still run into former students and often they say, I still have my pillow. They loved to do them, and they were so proud of them. There are a lot of skills incorporated in this project. It usually took around 4 to 6 weeks to complete most of them. But it took a lot of preparation time by the teacher before the kids even got to start them. I found that by planning ahead and working ahead, I was ready to teach this project with the least amount of hassle. 1. Cut the burlap. Most bolts of burlap are around 36 inches wide. Kindergarten, and 1st grade projects were all the same size- about 9 by 9 inches. So I cut little nicks every 9 inches along the side until I had enough for a class. Example: If your class was 24, I would cut 6 nicks, pull the strings across (to make a straight line) and cut across the last one. This would give me a piece 36 by 51 inches. I would then cut nicks on the bottom every 9 inches and pull strings there. Now I have a piece of material that has lines showing the 24 squares. Take a good pair of cutting shears and cut your pieces. Stack the pieces so they will remain straight. If I had choices in the color of burlap, the kids often preferred white, turquoise and sometimes yellow. If it was possible, I let them choose the color they wanted (especially the older kids) I usually used yellow for the younger ones. Grade 2, 3, 4 and 5 was 12 x 12 inches. So cut the nicks every 12 inches. 2. Drawing was done with a permanent marker (black sharpies). I usually took them home and worked on them while watching TV at night. The 3-5 kids would have written what they wanted written on their project on a piece of paper with their name and room# on it. I would pin the nametag to the burlap with a Stitchery needle. That way they already had a needle and their nametag when I passed them out. And they would put their needle back on the nametag and burlap to hand them back in. I showed them how to put the needle in and out through both the tag and burlap, so the needle wouldn’t fall out. 3. Kindergarten- project was lines with a heart in the center, so they had no choices. Everyone got the same thing. I drew the heart in the center and filled it in with permanent marker. Then I made the lines around the heart, 3 rows. I pinned the needle and a name tag I had made onto the project. 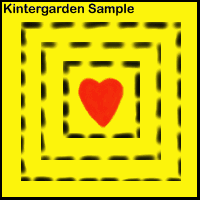
1st grade- I (heart) you, or mom or dad. I asked them what they wanted and made a note beside their name in my grade book. I also made their name tags and pinned them to the project with a needle. 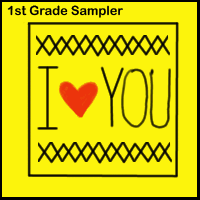
2nd grade- 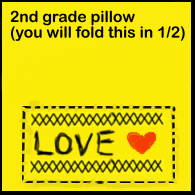
3rd grade- This project had letters that were to be filled with stain stitch, so the letters had to be hollow to be filled in. They had a choice of PINS, MOM, DAD, LUV, or 3 initials. They had to tell me ahead of time and I made them name tags too. I pinned the nametag to the project with the needle. 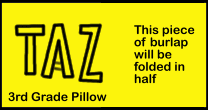
4th grade 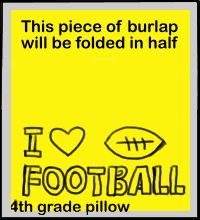
5th grade 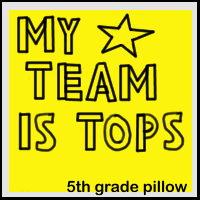
I would store each classes projects in crates I could carry around, put on my desk and they could put their projects back in the crate, then I would put them in a closet, on a shelf or something. I would precut the yarn in arm length pieces and put it in a box or crate. Mornings I would look to see what colors I needed to replenish. Little scraps were put in a separate scrap box for other projects or if someone needed a little piece to finish a letter or something. |