|

|
|
|
|
| (This used to be one of
our very favorite projects. Time constraints have eliminated this from
my lessons for the last several years. This is a long project- It will take
several weeks to complete, with drying times in between. Be sure you
have enough storage space, where the pieces will not be bothered in between
workings. I usually only did this with a couple of classes at a time.
Summer school art programs and art clubs -if you have such a thing- are also
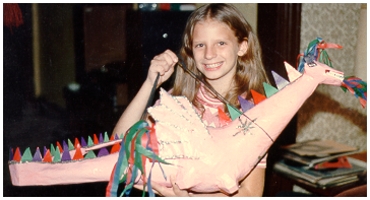
a good time to do this.) Grade level: 3-up ( In summer school I have done this with multi-levels with the older kids helping the little ones.) Key Concept-Goal: After being shown how to put together a piggy bank, the student will create one of their own design. Vocabulary: paper mache, construct, paste, tape, decorate. Essential Skills-Objectives-Art Aims: The student will learn how to follow a sequence to put together a finished product. Engagement Activities- Procedure: Use visual sheet as a handout. 1. Blow up a balloon to about 6 inches. Cover the balloon with one coat of newspaper strips and water. 2. hen cover with several coats of paper mache paste and water. Be sure to leave the money hole uncovered. Let dry. Add name tags every time you cover the old one up. 3. Tape egg carton feet on the bottom of the egg. 4. Cover with paper towel strips smoothly and let dry. 5. Tape newspaper cones for tail and neck. 6. Cover with paper towel strips and let dry. 7. Make wings if you want them. Use chip board and cover with paper towel strips and let dry. 8. Cut slits in the side of bank for wings. Insert them, tape them and cover tape with paper towel strips and let dry. 9.Paint and let dry. 10. Decorate. You can add tissue paper fire and glue to a straw and stick it down the throat with glue. Add spikes on back with construction paper. You can add a horn and arrow tail. You could add tissue paper streamer to tail and horn. You could add designs to body with tissue paper or construction paper. Paint shiny acrylic on body to give it a protective finish. You can also add glitter, trims, sequins or whatever to fancy it up. Tie strings around the neck and tail and join them above the wings to carry and/or hang them from the ceiling. Materials: balloon, cup, newspaper strips, newspaper, water, paper mache glue, paint, brushes, acrylic polymer, construction paper, chip board, decorating materials. Organization for distribution: Give everyone a balloon have them blow it up and tie it. (If you blow them up, your jaws will hurt, I guarantee it.) Newspaper strips will be in a box on the table. Tables will be covered with newspaper. Other stuff that is needed will be on counter. Work period-guidance: Make sure that the first layer is put on quickly and get at least two layers with glue on before end of period, or paper will fall off when it dries. Make sure them don’t make it sloppy with glue. Run paper strips through fingers to get off excess glue. Smooth out strips as you put them on. The more layers you put on, the stronger it will be. Put name tags on project when you put them on the window sill to dry. Cleanup: Roll up newspapers and put them in the wastebasket. Put glue back in big bottle at the sink. Keep bottle covered when not in use, so glue does not dry out. Put boxes of newspaper back on the back counter. Wash off tables with sponges. Assessment- Evaluation: Does it hold together? Is it smooth? Is is painted and decorated neatly? Other Teaching Aids: Examples hanging from ceiling and on shelves. Variations: We have done pigs, giraffes, teddy bears, kangaroos, skunks, beavers, mice, alligators, and other animals I can’t even remember. Higher Level Questions: How can you create an interior structure for any animal? What makes the project sturdy? How can something that was wet become hard? |
|
|
|